
Suthorn Ruins is an early dungeon in The Legend of Zelda: Echoes of Wisdom, immediately after the Stilled Suthorn Forest. In Suthorn Ruins, you’ll learn the Bind ability and fight the game’s first bosses.
Our Zelda: Echoes of Wisdom guide will show you a full Suthorn Ruins walkthrough, including where to find the dungeon map and how to beat both bosses.
Suthorn Ruins 1F walkthrough

Right when you enter Suthorn Ruins, interact with the waypoint in the upper-left corner of the first room to unlock the fast travel spot. In the next room, interact with the giant boulder (pictured above) to learn Bind.
Bind is an ability that’ll help you solve many puzzles throughout Echoes of Wisdom. By casting it on a monster or object, its movement becomes tied to yours. Bind allows you to easily move large objects to solve puzzles — like, for instance, shifting a giant boulder out of the way so you can step onto the switch behind it, thus opening the locked door you need to open. (That’s what you need to do to exit this room.)
The next room has a ladder heading down and a door leading to the left, although it’s on a platform you can’t reach. To reach the door, use Bind to carry the boulder, then drop it in between the ramp and the platform, like so:

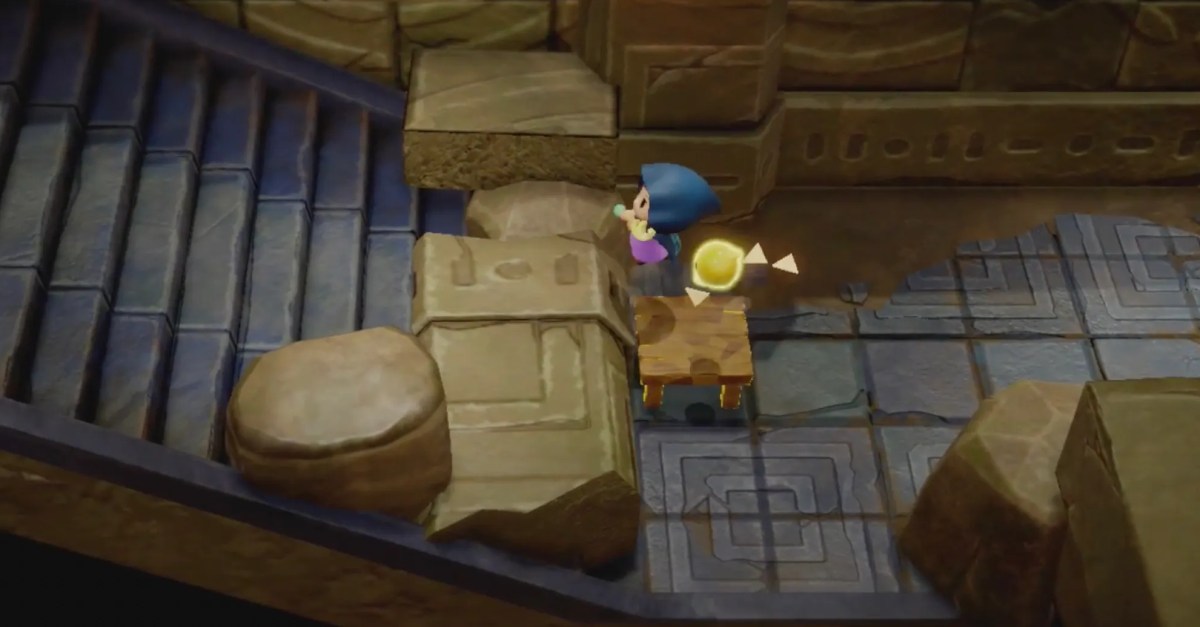
Behind the door, you’ll find a chest embedded in a pile of dirt. Use Bind to remove the chest, rewarding you with five radiant butter. Go back into the room with the boulder and the ramp, and climb down the ladder. You’ll find yourself in a two-dimensional side-scrolling space full of spiders.

You can jump and climb on the silky lines of web left by the spiders. Keep heading right until you see a chest on a platform above.
Suthorn Ruins dungeon map location
To reach the chest, use Bind on one of the nearby spiders. Carry it to the ledge with the chest, placing the spider such so its silk thread allows you to climb to the chest. Use Bind on the spider again to get it off the thread. Then, place a trampoline or table beneath the silk thread to reach it.
You’re looking to replicate something along the lines of the following:

Opening the chest gets you the Suthorn Ruins dungeon map.
To get back to dungeoning, use Bind to move the rightmost spider right by a few inches. Climb up its thread and then up the ladder on the right to return to the main part of the dungeon.
In the next room, use a trampoline to reach the ledge on the right. You should be able to jump across the gap to reach the ledge on the left:

In the next room, go right and stand on the elevator to automatically get taken to the second floor of Suthorn Ruins.
Suthorn Ruins 2f walkthrough
Right away, you’ll encounter a darknut. We were able to defeat it with a spear moblin, which resulted in learning the Darknut Echo.
At the top of the stairs, there’s nothing to your right. Use a table to get over the fallen column (pictured below), then exit through the door at the top of the next set of stairs.

Climb down the ladder in the next room to enter a two-dimensional section. Jump across gaps until you reach a ledge with nine boxes, which you can destroy with a caromadillo, revealing seven floral nectar and a brazier:

To exit the room, you’ll need to light the brazier that was behind the boxes. Use echoes to create a makeshift staircase (we used a table and a crate), scale it, and summon an ignizol to ignite the brazier. This will open the gate to the ladder on the right, which you can then exit through.
Suthorn Ruins statue puzzle solution
In the next room, you’ll see four darknut statues, one of which is holding a shield. Use Bind to remove the shield to open the gate.

The room after that contains a few keese and darknuts. We defeated them by summoning an ignizol and then a darknut. Climb the really long staircase after that to arrive at the first boss of the Suthorn Ruins.
How to beat the Suthorn Ruins miniboss

The first boss of Suthorn Ruins might be familiar: It’s Link! During phase one, Link will slowly and methodically try to close the distance between you, and slash with his sword. During phase two, Link will gain a purple aura and move a little bit faster. The tactics remain the same for both phases.
- Summon a spear moblin to hit him with ranged attacks from behind while you attract his attention.
- If you have the Peehat Echo, lean on it — a peehat’s spiral of rotating spikes can damage Link even when his shield is up.
- You can use Bind to remove his shield (hey, just you did with the darknut statues!), exposing him to powerful echoes like darknuts.
Keep at it and you’ll eventually whittle Link down. And if you need to heal at any point during the fight, the pots strewn around the room contain hearts.
Once you defeat Link, you’ll unlock Swordfighter form, which allows you to temporarily wield a sword and shield as if this were any other Legend of Zelda game. Activate Swordfighter form and cut through the rift in the back of the room to proceed to the next part of Suthorn Ruins.
Suthorn Ruins 2f walkthrough (part two)
You’ll descend the ladder leading from Link’s boss fight chamber and enter a two-dimensional room.
The chest on the right contains the Heart Pin accessory, which increases the frequency hearts appear when you smash pots and stuff. To reach it, place two decorative shrubs near the ledge leading to the chest. Then climb the ladder on the left side of the room back to the upper ledge. Drop down onto the shrubs, then use a table or a trampoline to leap to where the chest is. You’re trying to replicate this setup:

To leave this room, use Bind on the giant boulder and head down the ladder.
Suthorn Ruins 1f walkthrough (part two)
You’ll end up back on the first floor of Suthorn Ruins. Go through the only door in this first room, which will lead you to a hallway leading to a locked door guarding the final boss of Suthorn Ruins. Since you can’t do anything with the locked door, go through the first door on your left. You’ll end up in a room with three deku baba:

Use Swordfighter form to reach the one behind the rift. Defeat all three (either with Swordfighter form or with echoes like a spear moblin) to unlock the top door and the left door, and earn the Deku Baba Echo. Go through the door on the left first.
In this room, which contains a statue and a chest (with 50 rupees) behind a gate, you’ll need to move the statue to a switch. Use Bind on the statue, then walk up the ramp in the center of the room, drop off the ledge, and guide the statue to the switch on the right, like so:

Exit back out of this room and then head through the door leading up. In the next room, use Bind to pull the deku baba into the gap:

This will cause a chest containing a small key to spawn. Go back to the main hallway that leads to the boss chamber, then go through the first door on your right, which you can now open with the small key.
In this room, use Bind to move the out-of-place statue to the position shown below. Doing so will drop the gate, which allows you to take the ladder to the next room.

The ladder leads to a two-dimensional room with a series of moving platforms. Tri will teach you the Reverse Bind ability, which allows you to mirror Zelda’s movement to the trajectory of any moving object. Use Reverse Bind to attach yourself to moving platforms to cross each gap. When you reach a segment where two platforms are right above each other, line up your Reverse Bind as close as possible to vertical between the two platforms, like so:

Climb the ladders to exit this room, which will lead to a room with a statue and a chest containing the big key — though both are behind a gate. Use Bind on the statue, and move it onto the switch (you can gain some extra height by jumping):

From there, head back to the main hallway leading to the boss chamber. You’re now ready to fight Seismic Talus, the boss of Suthorn Ruins.
How to beat Seismic Talus, the Suthorn Ruins boss

Seismic Talus has three moves throughout the boss fight:
- Seismic Talus will start the fight by “throwing” one of its fists at you. You can dodge this by constantly moving around the room in a circular manner.
- Seismic Talus will spin in a circle. When it stops moving and holds its arms out horizontally, keep your distance.
- Seismic Talus will raise its arms up and slam them onto the ground.
On that last attack, circle around Seimic Talus and use Swordfighter form to attack it until a purple orb pops out. Continue using Swordfighter form (you’ll gain some addition energy for it from causing the orb to pop out) to wail on the orb until Seismic Talus reappears.
The boss fight follows the Video Game Rule of Threes: Repeat that process three times. For the second orb, one of Seismic Talus’ shoulders will glow purple. Use Bind to pull the orb out of its shoulder, then hit attack it a ton with Swordfighter form. For the third and final orb, Seismic Talus will glow red, and its attacks will be faster. Use Bind to pull the orb out of its head, then wrap up the fight by attacking the orb a bunch.
Upon winning, you’ll get five unusual crystals, a heart container, and an increase in Tri power for your victory. You can exit Suthorn Ruins via the glowing green spot left behind by Seismic Tallus. For where to go next, consult our full Echoes of Wisdom main story walkthrough.


